Simplifi Contact - Register an ALGO SIP Speaker
This guide provides instructions to get an Algo SIP endpoint registered to your Simplifi Contact account. You can also use these steps to troubleshoot a failed registration.
For device-specific instructions to discover the IP address, use the Algo Network Device Locator.
- Log into the web interface by typing the device’s IP address in the web browser.
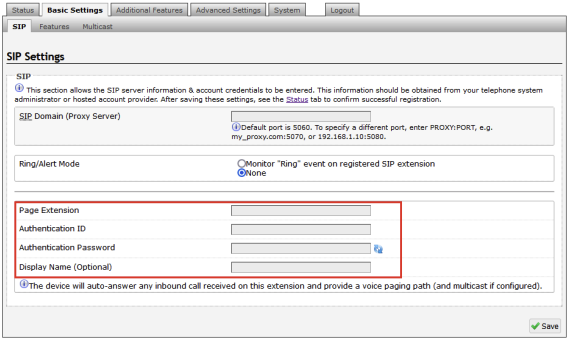
- Navigate to Basic Settings > SIP (the following credentials are available through your Simplifi Core platform or by request to support@simplifi.io.
- In the "SIP domin (proxy server)" field, enter the account realm.
- _____________
- In the "Page Extension" and "Authentication" fields, enter the device's SIP credentials:
- Page Extension: _____________
- Authentication ID: _____________
- Authentication Password: _____________
- Click Save

- In the "SIP domin (proxy server)" field, enter the account realm.
- Navigate to the Status tab to verify that registration was "Successful".
- If registration was not successful, navigate to Advanced Settings > Advanced SIP
- Set the SIP Transport to Auto (DNS NAPTR)
- Enter your Outbound Proxy address
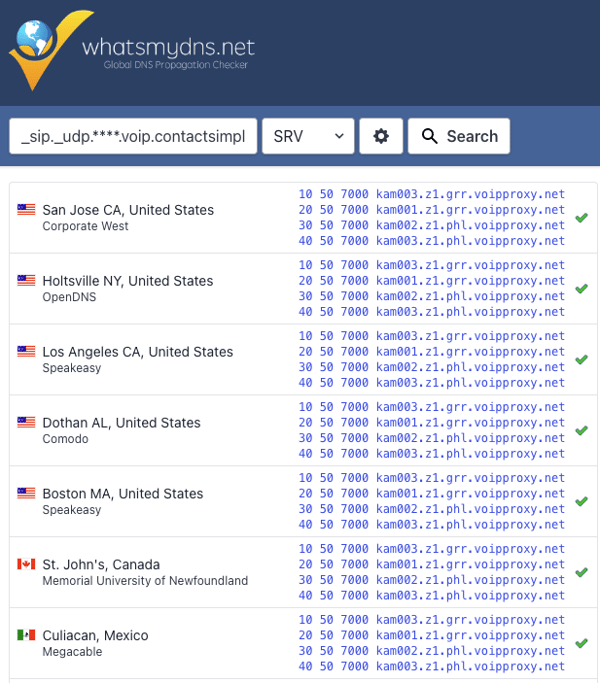
- You can find your Outbound Proxy address by navigating to whatsmydns.net
- Enter the following into the search bar:
- _sip._udp.(the SIP domain from step 2.a. above)
- Select SRV from the dropdown menu and click Search
- Copy any one of the proxy server addresses that have populated
- example: kam003.z1.grr.voipproxy.net (see image below)
- Navigate to your Windows Command Prompt or Apple Terminal and type in the following:
- ping (plus the copied proxy address from above), then press the Enter or Return key on your keyboard.
- example: ping kam003.z1.grr.voipproxy.net
- The outbound proxy address (IP address) will be listed in the Command Prompt or Terminal.
- ping (plus the copied proxy address from above), then press the Enter or Return key on your keyboard.

