Click2Call will make the connection to the number through the user's Simplifi Core portal with a designated device belonging to the user.
Acquiring and installing the extension is done in the same action. Once you find the extension, clicking on it will install it to your browser.
You can find the extension in one of two ways:
- Click this direct link to the extension where it resides in the Chrome Extension Catalog: DOWNLOAD
- Visit the Chrome extension catalog and locate it therein.
- Access the Chrome extension catalog, HERE
- In the left menu panel, there is a “Search the store” search field. Search for
“Click2Call ucapps” and press the enter key on your keyboard. - Click the result and then click the “add to Chrome” button on the next page.
Using the Extension
Once installed, the Click2Call plugin will be represented by a phone icon in the top right of the browser window. It will be directly to the right of the URL bar. The icon will be red or green depending on the state of the extension.
- Red - signifies that the extension is not logged in, or there is problem preventing the plugin from functioning.
- Green - signifies that the extension is logged in and functioning.
If the Click2Call icon is red and you click it, a login interface will display. You cannot utilize the plugin if you are not logged in.
The login Interface will show the following:
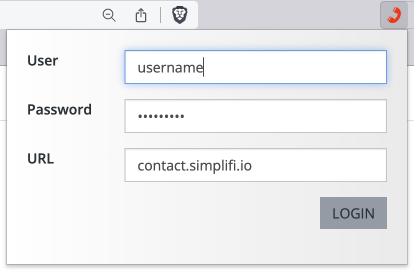
- User – Enter the portal username. This user must be simpleuser enabled; meaning that the user must have simpleuser role enabled and have an associated device user.
- Password – Enter the user’s password for the portal in this field.
- URL - The portal address is contact.simplifi.io. You do not need to enter the https:// in the URL field.
- Login button - Once the user credentials and url are entered, click the Login button and the extension will be able to access the user portal.
Once logged in, the Click2Call icon will be in its green state and the browser will now do the following:
- Telephone numbers are converted to clickable links.
- Clicking on a phone number link will initiate a connection to the number through the user portal and with the
user's chosen device. - Clicking on the Click2Call icon itself will reveal a dialogue box giving you access to the rest of the Click2Call features.
The Click2Call Dialog Interface (After Login)
When the plugin is opened for the first time after login, it will default to the Home panel; otherwise it will default to the panel which you last accessed. The other two panels are “Favorites” and “History.” To access any of these three panels, click the corresponding link in the navigation bar. And, to log out, click the “Log Out” button in the top right corner.
Home Panel
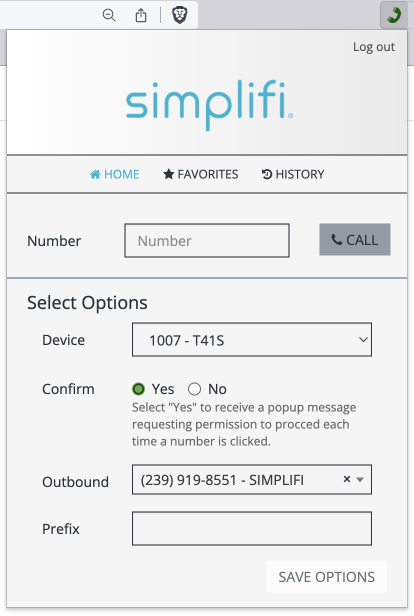
- Number: Type or paste a phone number that you wish to call, then click the “Call” button next to the field.
- Device: This dropdown will list all devices registered to the user. Whichever device the user selects is the device that will ring on theuser’s end when starting a call from the plugin. Once the user answers the selected device, then the call will connect on the other end. If a selection is made in this dropdown, the “Save” button must be clicked to update the plugin.
- Confirm: Select “yes” to enable and “no” to disable.Then click the “Save” button to register the change with the plugin. If “yes” is selected, then a confirmation window will appear each time a user clicks a phone number. Clicking yes in that confirmation window will connect the call. Clicking no in that confirmation window will cancel the call.
- Outbound: This is a new feature to Click2Call. All phone numbers associated with the user will appear in this dropdown list. Selecting a number and clicking the “Save” button will update what number the Click2Call call will be associated with.
- Prefix: This a new feature to Click2Call. Enter the prefix you want dialed before each
Click2Call call and click the “Save” button. If the prefix requires an asterisk, be sure to
include that in the text field. To remove a prefix, delete all text in the field and click the
“Save” button.
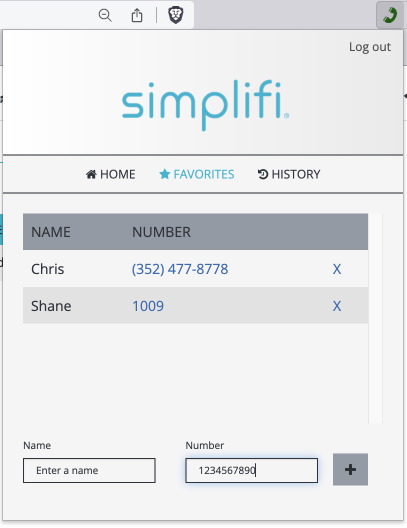
Favorites Panel
Here is kept a table listing of any numbers that the user has deemed necessary to remember. The table is scrollable. It lists entries by Name & Number. Under the table is the ability to add
more to the listing.
- Name: An arbitrary name for the entry. It can be anything the user needs to identify the number.
- Number: This expects an entry of phone number format or string of 10 digits.
- +Add Button: On click this will save entries for
Name & Number and add them to the listing.

History Panel
Here is kept a table listing of the last 20 calls the user has made. It lists entries by time/date, number dialed, and device used.
Other Things to Know
- 10 failed login attempts will add the user's IP address to the blacklist. Additional attempts to log in will get a "You have been blocked. Please contact your system Administrator" response.
- If the portal user is not setup properly as a simple user, the login will fail with a response of "Your user does not have permissions to use this feature.”